• Skip to primary navigation
  • Skip to main content
  • Skip to footer

Fischer Engineering Design Center

College of Engineering Twitter hashtag #NewZachry Instagram hashtag #NewZachry College of Engineering Facebook
Texas A&M College of Engineering

Fischer Engineering Design Center

Resource central

  • Home
  • Access
    • Apply for Membership
    • Badge System
  • Facility
    • Project Design Center
    • Prototyping Center
    • Fabrication Center
    • Artisan Center
  • Popup Courses
  • Services
    • Engineering Service Center
    • Service Types
      • Service Request Form
      • Self-Service Request Form
    • Team Account
    • Space Reservation
    • Tour Request
  • Calendar
  • FAQ
    • FAQ – iLabs
    • FAQ – Design Studio
    • FAQ – Fabrication Center
    • FAQ – Prototyping Center
      • 3D Printing FAQ
      • Laser Cutting FAQ
      • Printed Circuit Board FAQ
  • Contact Us

FAQ – iLabs

You are here: Home / FAQ / FAQ – iLabs

iLab Design Center

Table of Contents:

  • Create an iLabs account (undergraduate)
  • Overall Navigation
  • Search for Design Center core
  • Schedule Equipment
  • Check In with Equipment Kiosk
  • Check Out with Equipment Kiosk
  • Start a Walk In Session
  • My Reservations

How to create an iLabs account (undergraduate)?

1.Go to iLab portal

https://tamu.corefacilities.org/

2. Click sign-up

3. Use your TAMU user login (net ID and password)

4. Choose your course name from the PI list (ZACH-FEDC : General Usage)

5. Select your time zone

6. Click Set

7. Our staff will approve your membership in the core. After that approval, you will be able to schedule equipment.

Overall Navigation

iLab uses a navigation structure that relies on a left-hand navigation panel (typically hidden) for access to all high-level system areas, combined with several navigation elements at the top of the screen that provides access to various system functions. The main area of the screen contains the currently active interface.   

  1. Show/Hide navigation: The left-hand navigation panel is usually hidden, but can be shown (and hidden again) by clicking on the on three horizontal bars at the top-left of the screen. 
  2. Home: When you log into iLab, you will automatically be taken to your home page‍. You will see a welcome from the core, as well as a brief description of the core. Additionally, you may see some steps to get started. From here, you may access service requests, messages, your cores and institutions, and all features available in the left and top navigation panels. 
  3. Core Facilities‍: Click on this section header to list and search all core facilities‍ at your own institution, as well as at partner institutions and other outside institutions.
    • my cores (Core Administrators and Staff): Clicking this link displays a list of the cores of which you are an administrator and staff member. You can also hover over this link to bring up a pop-up interface, from which you can quickly select a core.
    • my reservations‍ (all Users): Displays an overview of all of your current, upcoming and recent reservations in iLab.
    • view requests (PIs and Lab Managers): Provides access to all service requests order through your Lab / Group
    • invoices‍ (all Users): Provides access to all of your invoices
    • time entry‍ (Core Administrators and Staff): Access an interface that allows you to log your time against certain project IDs (if enabled)
    • publication tracker (Institutional Administrators, Core Administrators and Staff): Provides access to an interface to track publications to which your core’s work contributed (if enabled).
  4. Reporting‍: The Reporting‍ interface allows you to run reports on all data in iLab that you have access to. 
  5. Manage Groups: Click on this section header to show a page with all groups, departments, cores and institutions you have access to.
    • my groups (PIs and Lab Managers): Provides access to all Labs/Groups of which you are a member
    • my departments (Institutional Administrators): Access the departments at your institution
    • my cores (Core Administrators and Staff): Clicking this link displays a list of the cores of which you are an administrator and staff member. You can also hover over this link to bring up a pop-up interface, from which you can quickly select a core.
    • [Institution Name] (Institutional Administrators): The institutions to which you belong will display here. Click on an institution to be taken to the home page.
    • people search (all Users): Find people in iLab and perform certain management functions, depending on role.
    • purchase orders (Institutional Administrators): Access an interface to view all open and pending purchase orders (if enabled)
  6. Search cores and services: You may use this tool to search for specific cores and services. Enter a key term or the first few letters and click Go! Your results will display on the page.
  7. my profile: Click here to view and edit your user profile
  8. System upgrades: This link gives you access to all messages regarding the system and updates/feature/bug fixes of the iLab software.
  9. HELP: The Help link brings you to iLab’s customer support portal‍
  10. logout: Click here to logout of the system.

For more information click here

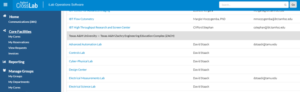
How to search for Design Center core?

1.Go to i-Lab portal : https://tamu.corefacilities.org/landing/276

2. Login as “TAMU” user.

3. You can search for the relevant lab(s) by clicking on the sandwich button on the top left of the webpage. Next, search for core facilities.

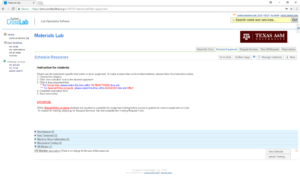
4. Click on interested lab to view the equipment list

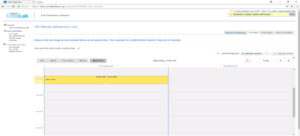
How to schedule equipment?

1.Click on “Schedule Equipment”

2. Select the appropriate category

3. Click on “View Schedule”

4. Click and drag the calendar to reserve the equipment.

5. Type in your name

6. Choose the ZACH-EDC: General Usage for lab

7. Click “Next”

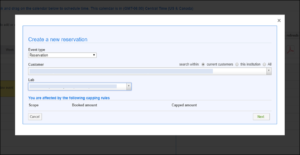
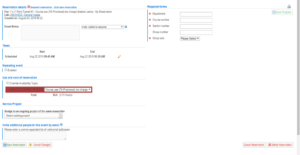
8. Complete the form (if applicable) 

9. Click “Save Reservation”

For more information click here

How to use Equipment Kiosk (check in)?

1.Scan the QR code at the main entrance. It will direct you to iLabs kiosk login page.

https://tamu.corefacilities.org/service_centers/4520/equipment_kiosk/dashboard

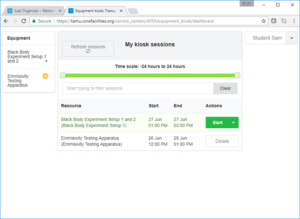
2. Scroll down the page until you find the name of the labs that you are planning to do the experiment.

3. Click on the link and sign in using your TAMU credential

4. Your reservation should show up under the My kiosk session heading

5. Click “Start”

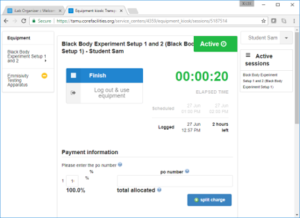
6. Click Logout and use equipment so that others can use the Kiosk while you use the equipment.

7. Logout from the Central Authentication Service.

For more information click here

How to use Equipment Kiosk (check out)?

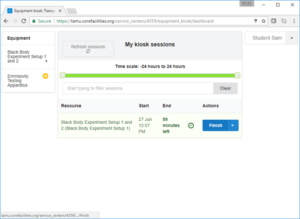
1.Log into the iLab Kiosk

2. Click Finish

3. Confirm finish on the pop-up

4. Logout from i-Lab

5. Logout from CAS

How to start a walk in session?

If allowed, the kiosk interface can also be used to create a walkup session that starts immediately. To do so, click on the button that says ‘Start Walkup Session’ in the left-hand side of the screen. You will then see a list of resources available for creating a walkup session. Choose a specific resource in the Equipment panel.

  1. Select the equipment you want to create a session for.
  2. The middle panel will display the schedule for the selected equipment
  3. Start a new session. A pop-up will ask the planned length of the session. Click “Create Session” to immediately start a session. 
  4. Click this link, available under the right-hand profile menu, to bring you back to the reservation display 

My Reservations tab

The “My Reservations” interface can be accessed from the left-hand side of the overall navigation‍, providing an overview of current, future, and past reservations. Note that it is only available if you have already made reservations with a Core.  

  1. Hamburger Icon: Clicking on this icon, opens up the left-hand menu.
  2. Overview of reservations: The main section of the My Reservations interface lists your reservations organized by reservations for today, future reservations, and past reservations.
  3. Favorites: From here you can view and directly access any resources that you have marked as a favorite.
  4. Recently used: From here you can view and directly access any resources you have used recently.

Differential tuition pays for enhancements to the learning experience of undergraduate students in engineering. These enhancements include extra sections of overfull courses, new computers and equipment, and even extra lecturers to teach classes. Learn more about differential tuition here.

Footer

Texas A&M College of Engineering

Learn More

College of Engineering

Sitemap

Copyright © 2023 · Texas A&M University College of Engineering · All Rights Reserved

State of Texas • Texas Homeland Security • Open Records • Risk, Fraud & Misconduct Hotline • Statewide Search • Texas CREWS • Site Links & Policies • Environmental Health, Safety & Security • Employment